

Ride with Blake | 5 Steps to Better Kite Control
Five steps to better kite control.
Hey guys, today I want to talk about five things you can do to dramatically improve your kite skills. After all, kiteboarding is mostly about flying a kite. I mean, kites have been around for thousands of years. Most people can have fun flying a small kite on a string. We have these amazing highly engineered tools that propel us across the water and into the sky. So it goes with out saying you need to spend a lot of time flying your kite and frankly just have fun with it!
Step one
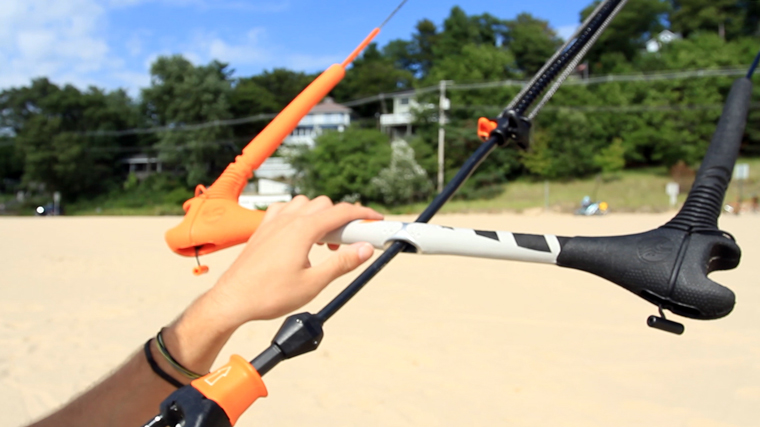
Rigging & making sure you have the right setting for the conditions. The first thing I would like to talk about is choosing the right size kite for the conditions. Every kite model and size is going to have a predetermined wind range where it will perform optimally. You can usually find this chart in the packaging or listen on the manufactures website. It's important to stick within these parameters if you want to have any fun and progress. That is why there is light wind kites and high wind kites.
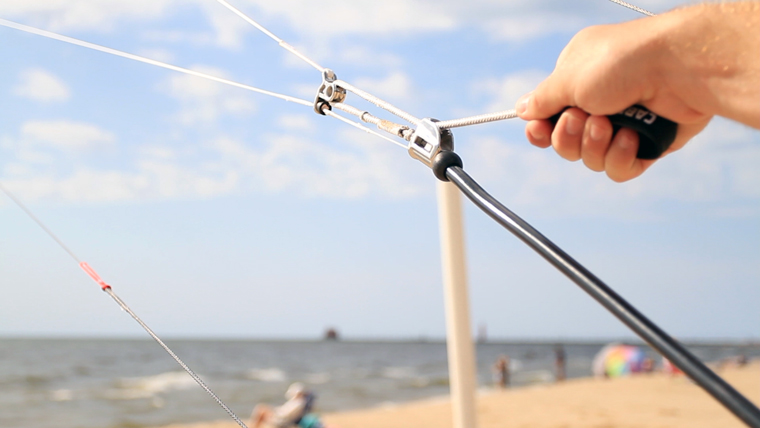
Now, every kite is going to have that grey area where it will still perform albeit, not optimally. In these situations you want to make use of all the adjustable options every kite offers. Some kites have more offerings than others but one thing that is standard among most brands is the knots on your steering lines. Most kites will have two to three knots you can chose from. If you are appropriately powered, you will want to choose the middle knot. If the wind is light you will use the knot closest to the kite. If the wind is strong, you will use the knot furthest away from the kite. Just remember, if the wind is light rig closer to the kite. If the wind is strong, go long. It's a little silly but this rhyme does help.
Doing this will change the angle of attack and make a big difference in power. You know you have the right amount when you park the kite and noon and pull the control bar in. It should just slightly lift you on your toes. Anymore and you’re are over powered. Any less and it might take a bit more skill to ride. It's always better to be slightly underpowered. I know its tempting to ride overpowered but true skill comes when practicing in light winds.
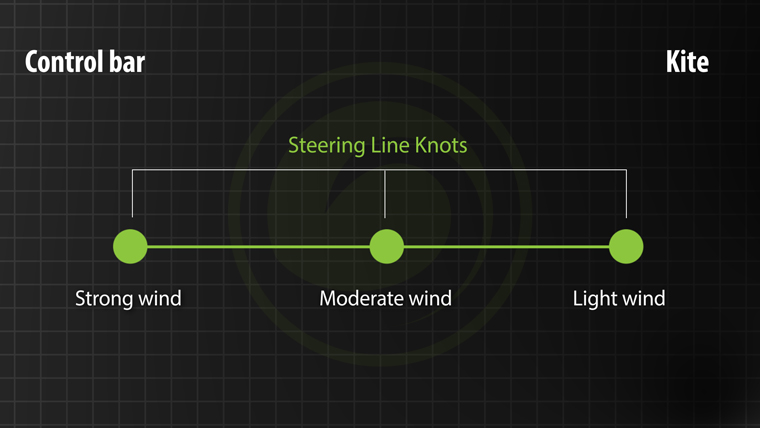
The middle knot is usually best if you're appropriately powered.
Step two
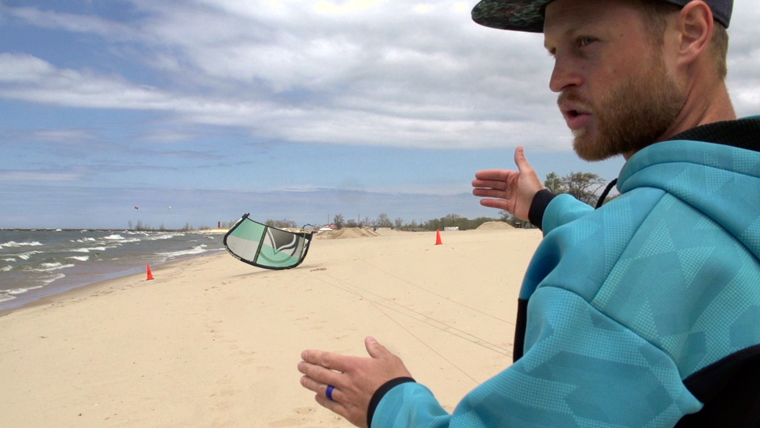
Trimming the kite. Before you take to the water, it is important to trim your kite so that it will not backstall. Sometimes on the closest knot you can over-sheet the kite. I recommend experimenting with the the trim on the beach before your session. To test this, park the kite at noon just like before. Now pull the bar all the way in. It should just sit there perfectly above your head. If the kite starts to fall down into the wind window, simply push the bar away from you and it will shoot back it. I know its a little counter intuitive but trust me on this one. This also comes into play when jumping or unhooking. Sometimes when doing a trick you go to load your kite or your coming down from a jump and the kite simply falls out of the sky or shoots behind your head. This means you need to trim your kite. Follow the steps I just described to correct this as well.
Make sure you trim your kite.
Step three
Understand the wind window will change with different winds.There is a light wind skill set, a moderate wind skill set, and a high wind skill set. Sometimes in gusty you need to use all three skills sets in the same session. Something I've noticed while teaching kiteboarding lessons over the years is that my students will take a lesson and do well. Then a few days later they get back out in different wind conditions and it's like starting all over again. This can even happen to seasoned kiteboarders who had a light summer and come into a gusty fall day. All of a sudden everything they know goes out the window and they are rookies again. Don't get frustrated. This is part of kiteboarding, you need to make a point to practice in all of the wind conditions, especially the lighter winds. Light wind can be the most frustrating of all. It takes the most skill to be able to ride up wind and do tricks on a light wind day. Remember, these are the safest days to learn and you're going to get the most out of them. So do yourself a favor and have fun and practice.
Train in light winds. It's what separates good kiteboarders from average kiteboarders.
Step four
Have a point of reference. It really helps to have a point of reference downwind. Drop some sand in the wind and mark a point directly down wind. Look for a building, a flagpole, a pier. Anything really. Just know where the heart of the wind window and and realize that It may shift or change during your session. It's not uncommoer for new kiteboarders to get going and as they get up on the board they lose their point of reference. This causes them to fly the kite at the edge of the windwindow where there is very little power. The next thing they know, they are sinking in the water. If you know where down wind is, you can work your kite where it needs to be so you can keep riding or get upwind.
Now, like I said, the wind windwindow will change depending on the wind speed. Remember, in light wind your window is smaller and you will need to work the kite while keeping it away from the edge of the window. In high wind you need to be subtle and gentle. It you want to slow the kite down on stronger days or you are trying a new trick, keep your hands close to the center of the bar. If you are riding in light winds and need a more responsive kite, fly the kite with your hands spread further apart. This will speed the kite up and make your life a lot easier.
Have a point of reference.
Step five
Fly the kite with your fingertips. While learning people like to hold on really tight and over steer the kite. Always be gentle with the bar. Kite control is a very subtle thing. Also just feel out the line tension. The goal is to keep soft even line tension. If you're flying and the lines get really tight or really slacked the kite will be aggressive. So line tension is everything. If you are aggressive with the kite, it's going to be an aggressive ride. If you are smooth and gentle, well, it's going to be a gentle ride. Modern kites really are amazing, they basically have auto pilot, so relax and let the kite do the work for you. These leads me to my bonus tip.
Fly with your fingertips. Let the kite do all the work.
Step 6
Breath. just breath. It’s amazing how often people hold their breath. This will help from the first time you fly all the way to the most advanced trick. Don’t hold your breath and let the kite do the work. If you're trying to learn or trying a new trick, its easy to get stressed and hold your breath or breath with a lot of tension. Jus close your eyes, take a breath and visualize yourself in complete control executing whatever maneuver your going for. This is the only way to land tricks. If you can see your self doing it well, chances are you won't. Now, if you stay positive, have fun breath, visualize then you will eventually get it.
Take a deep breath and visualize yourself landing the trick.
If you found this Blog and video to be helpful, please share it with a friend who might learn from it as well. Don't forget to like and subscribe to our channel as well. We drop anywhere from two to four kiteboarding videos a week and you don't want to miss out.
Peace - Blake
 Blake Olsen
A Michigan boy through and through (even though he was born in Saudi Arabia), Blake is a youth with a lifetime of experiences and adventures. Not only that, he's passionate about sharing his zest for life with others. He is proficient at many fields, including kiteboarding and acting as concierge to any who simply ask. Looking for an adventure? Well, Blake is your guy. From sailing the Gulf and the Caribbean to backpacking Hawaii and Southeast Asia, he knows his stuff and can make your vacation into an adventure.
Instagram: @BlakeTheOlsen
Facebook: BlakeOlsen
Recent Posts
-

Light Wind Wing Foiling Part 1: Choosing the Right Board
Jeff and Tucker are kicking off a three-part video series dedicated to light wind riding. If you l …28th May 2026 -

Reedin Wing Pack | Everything a New Wing Foiler Needs to Get Started
Ready to start building your own wing foil quiver? The Reedin Wing Pack was designed from the grou …28th May 2026 -

Josh Gillitt Interview: From Durban to King of the Air
The Brazilian Brothers sat down with F-One pro rider Josh Gillitt, an international rider who has …27th May 2026