

How to Fix Uneven Lines on Your Kiteboarding Control Bar
Line sleeving tutorial on how to fix your kite lines:
This is Eric with MACkite, and we're going to learn how to check to see if your lines have stretched and how to fix that. If you've had some hard crashes recently and your kite just doesn't seem to be flying right, your lines may have stretched unevenly. It's like when your car is out of alignment and you take your hands off the wheel and it drifts off to the left or right, then you know something's wrong.
Make a Simple Sliding Pulley
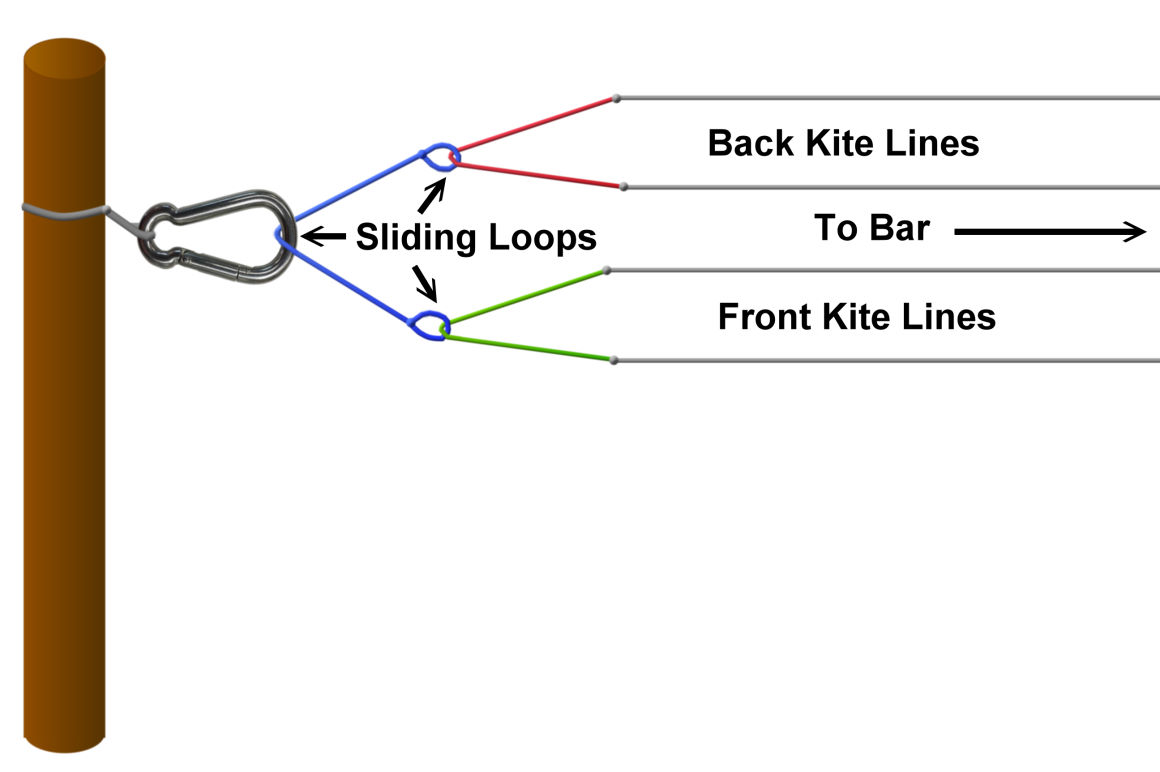
I made a primitive three-way pulley out of strings tied to a tree so I can have equal pressure on each line even though they're different lengths. I have my back lines attached to each end of a short line that goes through a loop at the end of a string so they can slide freely for adjusting the tension. My front lines are also attached to a line which runs through the other end of the string's loop. This loop can slide freely when you lean on it, so all four lines have equal stretch and tension even though they are different lengths. In other words, your back lines are connected by a single line, your front lines are connected by a single line, and those can slide freely through each end of a third line around the clip attached to the tree.
This allows you to distribute the load on all the lines evenly when they're not the same length. If you attached all of your pigtails directly to the clip, some would be tight and some would be loose, and you wouldn't know how much or where to mark the line for cutting and bending.
Check Your Line Lengths
Now I'm going to load up the lines. Tip: Make sure that you don't test the pressure facing your bar directly, because if your sliding pulley setup gives way you're going to fall on your butt. I always stand sideways, so if I break it by pulling too hard, I've got another leg to fall back on.
I want to make sure my bar is perfectly 90 degrees to the line. Make sure that your depower is fully powered, because if you measure with your depower strap you're going to cut your front lines eight inches too short. So make sure it's all the way open and that your chicken loop assembly is properly into the bar for exact measurements.
I have Aaron giving me tension on the bar, and I can see that my pigtails are all in different places, so all four lines are a different length. To even them up, we have to cut below the shortest line. You want to very carefully hold your lines together and mark a straight line with a Sharpie where you're going to cut, and then another mark down about 15 inches where the bottom of your sleeve is going to be. I use the red Sharpie where we're going to cut because if I cut myself, it would be red, so that's how I remember. Next we're going to come down about 15 inches, or roughly five hand-widths, and mark that with a black Sharpie. I have more room than I need right now because I don't want the sleeve to slide off while I'm playing with it. Double check that the lines are still tight and make your mark.
Cut and Re-Sleeve Your Lines
I've gone back inside into a clean environment where I can do some precise measurements while cutting, folding, and tying knots. We're going to find our red marks and we are going to cut on the red marks. The black marks are where we are going to line up our sleeves so everything's the same length.
You'll need a sleeving kit. This is your $7.99 insurance policy so that if you have stretched lines or a broken line, you don't miss out on riding, or maybe you'll save a session for a friend. This comes with four sleeves: the black ones are your front lines, and the blue and red are for your back lines. It also includes a wire to push through the sleeve and pull the line back through it. Why do you need to sleeve your lines? If you tie a knot in the line, the friction will cause it to cut into itself and weaken it by up to 50 percent. If you have a sleeve on it, it protects your line from breaking.
The sleeve is flat, so you want the wire to be flat in the same direction. Slide the wire into the sleeve. Be very careful when you do this, because if you rush the process you might shove the wire through the threads, and that damages the material. It's easier to put it on inchworm-style anyway, because when the sleeve is stretched out, it's a smaller diameter. If I bunch the material together, it makes a larger diameter that's easier to slide the wire through. As I run out of room on the wire, I can scrunch up the part that's already on the wire to make room for the rest of the sleeve. Once the end of the wire is sticking out, I can then insert the end of a line between these wires.
I'll put the sleeve down for a moment. Now I'm going to take one of our lines and look for that red mark. I'm going to try to cut right through the middle, so make sure you have sharp scissors. Once I've made my cut, I'm going to insert the line through the wire. Pull a bit of line through and fold it over so it doesn't slide right back out. Now we're going to feed the sleeve back over the line. It's hardest to get it started, but once it's started we can inchworm it on there. If it comes out of the wire you'll have to start over, so you just want to relax and take your time. You don't really want to do this when it's windy and you're seeing everybody else have fun so you rush the process. Ideally, you checked how long your lines were on a no-wind day and that kept you entertained.
Now that I've got it all the way through, I'm going to remove the line from the wire. Just to make sure that the sleeve doesn't slide off and I have to do it over again, I put a knot in the end of the line. Next you want to find the black mark, which is where we're going to line the sleeve up. Bring the sleeve all the way down to the mark. Remember that when it's scrunched together, it has a wider diameter, making it easier to move.
Once I have the black mark right at the edge of the sleeve, I'm going to pinch that end to hold it in place, and I'm going to run my fingers down the sleeve very aggressively to make it as tight and as long as possible. Then I'm going to fold the ends together. If the end of the sleeve moves off the black mark at all, that's going to make a difference and we'll need to scrunch it together again to get it back down to the black mark. This is one of the things you've got to watch because it's easy to get distracted. It seems like it's easy, but the devil's in the details and this needs to be exact.
Fold the sleeve in half and squeeze the end. Double check where your black mark is, and then tie a knot. It doesn't matter where the knot is; the folded end is still going to be in the same place. Just to make it look nice, you can try to have the knot close to the ends of the sleeve, but this isn't something you have to measure to the millimeter. Tie a simple knot and tighten it down.
The end of the loop is where you would attach your pigtails. You can also attach your kite directly from here, but it's best to put a set of pigtails on this loop because then they take the most wear, and it's easier to replace them than to redo your lines again.
Thank you very much for reading. This has been Eric with MACkite. Have a great day and pray for wind.
MACkite Subscription Links:
YouTube | Instagram | Spotify Oddcasts
Contact MACkite Below:
800.622.4655 | Kiteboarder@MACkite.com | LIVE Chat Messenger
Recent Posts
-

F-One Trigger Brainchild V3 with Josh Gillitt
The Brazilian Brothers are back and joined by F-One international rider Josh Gillitt. Together, th …17th Jul 2026 -

GKA Mykonos Part 6: Round 1 Rolls On
The Brazilian Brothers are on the beach in Mykonos for the 2026 GKA Big Air Kite World Cup, and th …17th Jul 2026 -

Cabrinha Switchblade Design Works: First Impressions
The Brazilian Brothers are back in Brazil for the 2026 windy season, and it's officially on. With …16th Jul 2026