

Kite Academy: Control Bar Rigging and Safety Systems
Welcome to episode three of the Brazilian Brothers and MACkite Kite Academy. The Brazilian Brothers are back with Nikki for what might be the most important video in the entire series. Today, they're covering everything about rigging the kite when it comes to the bar, along with the essential safety mechanisms of kiteboarding.
Unwinding and Walking the Lines
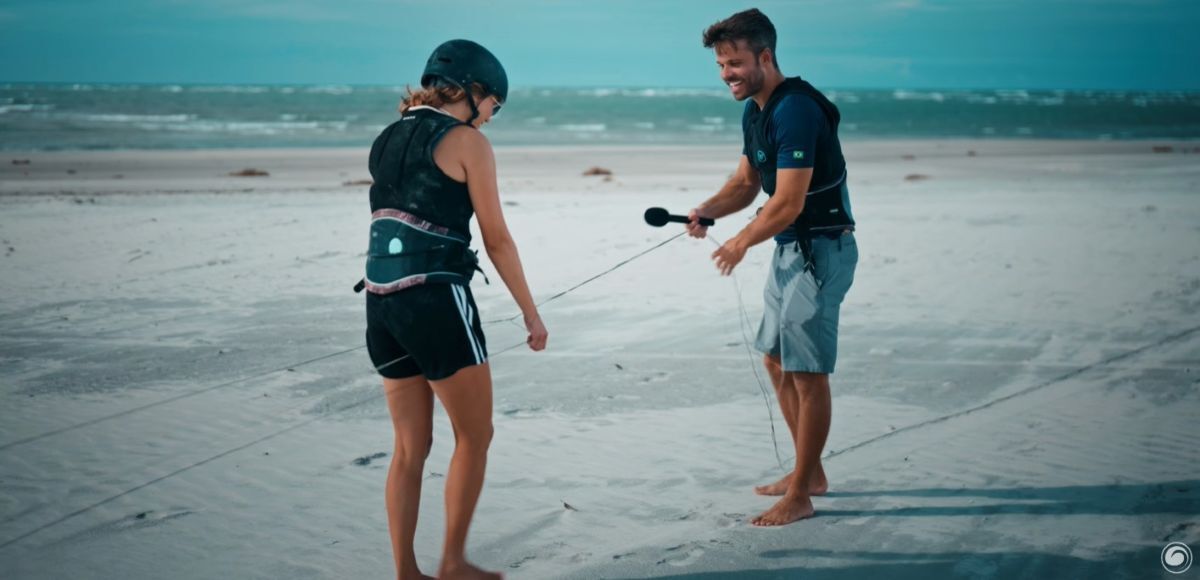
With the kite already secured with sand, the first step is to remove the latches from the bar and secure all four lines simultaneously. Drop the lines right near the kite, and then slowly start walking them downwind.
Correct Bar Orientation
Once you've walked the lines all the way down, the bar will be lined up right in front of you. The first thing to figure out is the correct orientation of the bar. On the Cabrinha bar they're using, there's white on the left and black on the right.
Because you're walking the lines downwind, you actually need to invert the bar. The easiest way to know it's inverted is by looking for the logo. The Cabrinha bar has a logo on one side and no logo on the other — if you're launching your kite downwind, make sure your logo is facing down. When the logo is facing down, you know the bar is inverted, so once you bring it up, it will be in the correct orientation.
You can also walk your lines upwind, but the Brazilian Brothers prefer teaching people to walk the lines downwind because you can see the lines, make sure there are no tangles, and it makes it easier to launch at the edge of the wind window.
Untangling and Separating the Lines
Next, you need to untangle the lines. Separate the outside lines (also called steering lines or back lines) from the center lines. This is the most important part. Place the center lines between your legs, and the outside lines on the outside of your legs.
Drop them starting from the outside line, making sure you don't tangle them with the center lines between your legs, and then drop the other steering line all the way out. Look back to make sure you've done a good job separating and aligning them.
Attaching the Lines to the Kite
Now that the lines are lined up correctly with no tangles, it's time to attach them to the kite.
Steering Lines (Outside Lines)
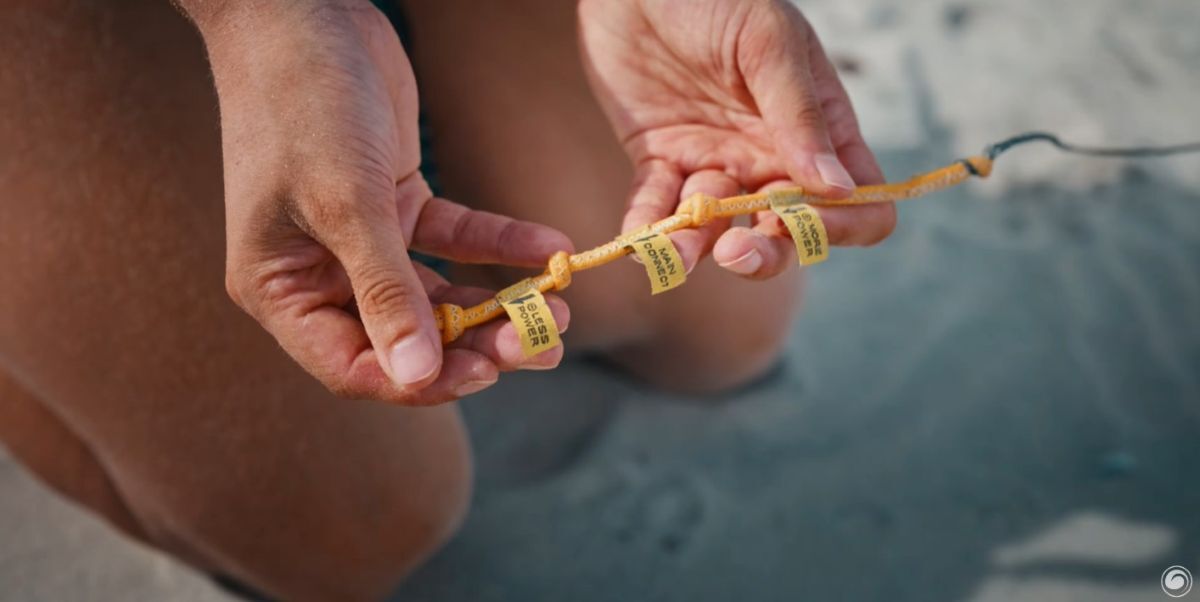
Start by making a Lark's Head knot. This is the only acceptable loop and knot in the kiteboarding world. From there, you have a decision to make on which of the three knots on the pigtail to attach the loop to. Each knot changes the angle of attack of the kite, effectively giving you more power, medium power, or less power.
For beginners just getting started, always go with the middle knot. A lot of people get this confused and choose the "more power" knot when the wind is very light, but that can be dangerous because it leads to a kite that's back-stalling. For your first 100 hours of kiteboarding, go with the center knot for the perfect balance. Make sure the knot is very tight, especially on the back, so there's absolutely no way it can come loose.
Center Lines
To attach the center lines, start on the right side and walk your way through the kite. Nikki demonstrates finding the bridles under the kite. You want to make sure these bridles are nice and free with no tangles—lift the canopy up and check them before attaching the lines.
For the center lines, use the same Lark's Head knot. There's only one option here: a knot joining the pigtail to the actual line. Always go for the very edge of the pigtail.
Connecting to Your Harness
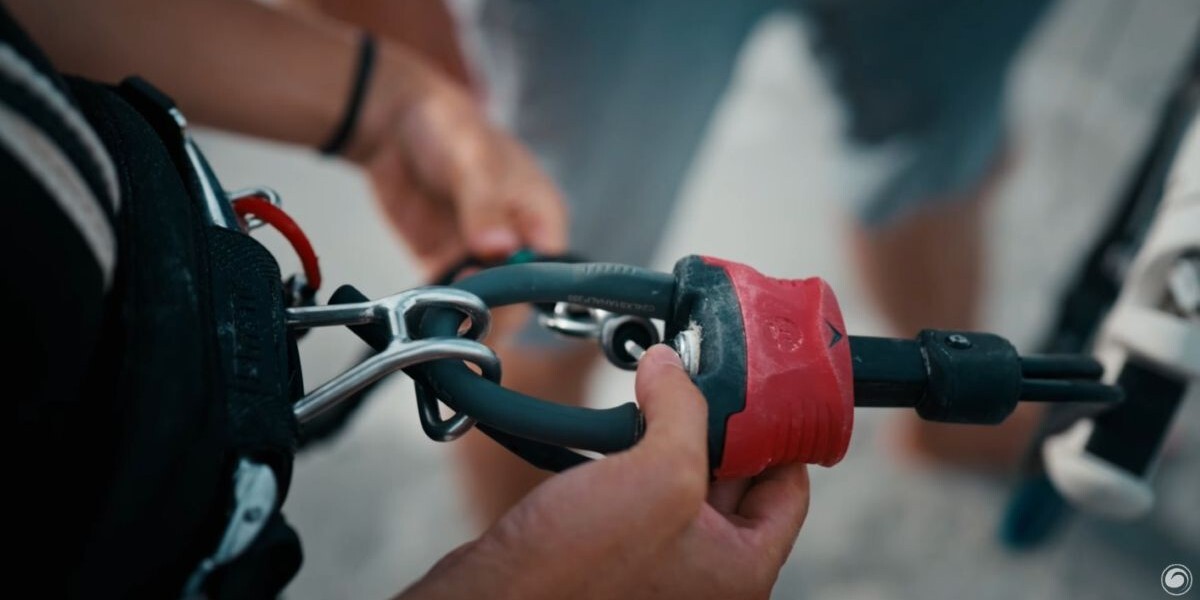
Now it's time to learn how to connect the bar properly to your harness.
- Attach the Chicken Loop: The first step is to attach your chicken loop to the hook on your harness.
- Insert the Chicken Finger: Next, insert the chicken finger (also known as the donkey stick) to make sure the bar is properly attached.
- Attach the Safety Leash: The last piece is attaching the safety leash. The Brazilian Brothers recommend attaching the safety leash from underneath the ring to make sure it's nice and free from any potential tangles.
The Three Safety Systems of Kiteboarding
With everything hooked in, it's time to walk through the three safety systems in kiteboarding.
- Let go of the bar: If anything happens, this is the first thing you should do. Do not hesitate. Letting go of the bar will solve 98 percent of problems and will cause the kite to lose power.
- Activate the quick release: If you let go of the bar and you're still getting pulled, release your quick release.
- Activate the safety leash: If you've already released your quick release and you're still getting pulled, use your full release on the safety leash to completely separate yourself from the kite.
The Eyes-Closed Safety Drill
One exercise the Brazilian Brothers love to do is having people practice these safety steps with their eyes closed. It's very important to be able to follow these procedures without actually seeing what's going on, because sometimes the bar can be underneath the water. Practice letting go of the bar, hitting the quick release, and activating the safety leash without looking, so you can find all the mechanisms by feel and do the sport safely.
MACkite Subscription Links:
YouTube | Instagram | Spotify Oddcasts
Contact MACkite Below:
800.622.4655 | Kiteboarder@MACkite.com | LIVE Chat Messenger
Recent Posts
-

Vayu Pyro 4M Parawing Review
Tucker has been testing the 4-meter Vayu Pyro — one of the most asked-about parawings on the marke …8th Jul 2026 -

Wakefoiling the FLITElab 808 Flux Behind the Boat
Tucker is out on the water in Grand Haven, Michigan, with Adam Bennetts from FLITElab. With no lak …8th Jul 2026 -

The Casati Family at GKA Mykonos: A Kiteboarding Dynasty in the Making
The Brazilian Brothers caught up with the Casati family on the beach at the GKA Kite World Cup in …8th Jul 2026