
Snowkiting - General Info
Snowkiting FAQs
Introduction
How do I get started?
What are the winds like?
How do I choose my gear?
Snow Kite Size Chart
What else do I need?
What do I need to know about exposure to cold temps?
Snowkiting Information
 Snowkiting is a logical winter choice for anyone who enjoys downhill skiing, snowboarding, or kiteboarding. It is also the best way to learn and practice the techniques used in kiteboarding. Because you aren't fighting waves or trying to stand up on a board in the water, snowkiting is much easier to learn as well. Not to mention, you need less wind and can use any wide open, snow covered area to snowkite. Downhill skiers and snowboarders really enjoy the fact that you don't need to drive to a resort and buy a lift ticket every time you want to go out and ride. The fact of the matter is, most of us have stopped going to resorts now that we have discovered just how versatile and enjoyable snowkiting can be.
A word about safety: Do not fly any traction kite (foil, LEI, or otherwise) in proximity to power lines or any fixed obstacle...distance is always your friend. Always use a leash that kills the kite's power when the bar is dropped. This is for your safety, the safety of those around you, and because we don't want to see anyone lose a kite.
A) Getting Started consists of 2 basic steps:
- Learn to fly a 2 line kite. If you are new to flying two or four line kites your first step must be to develop your kite flying skills. This can be done by buying or borrowing a two line foil trainer kite. This will teach you how to launch/land the kite, how the kite develops power, and give you experience flying a kite on a bar. For snowkiting your trainer kite can also be used as a high wind kite. A 3m foil trainer is plenty of kite for 180lb person in 20 mph winds on hard packed snow or ice. Check out our Kiteboarding FAQs page for help in understanding the powerzone and other terminology.
- Buy Gear - Come to the store and speak to our staff to get advice for your riding style, weight, where you will ride, etc. What works for one rider might not work for the next. Advanced riders will likely fly a much larger kite than what you will be able to handle during your first couple of sessions. Kite size depends not only on rider weight and snow conditions, but also what you intend to do. For those who are interested in getting out and enjoying an afternoon of cruising, you will need less power than someone trying to jump high or set a new personal speed record.
B) Wind During the Winter Months.
Winter winds in the area offer a lot of options for riding that are not available during the summer months. Because you are riding on frozen inland lakes and fields, almost any wind direction is rideable. The colder air is also more dense, providing more power with less wind speed. Depending on the size of kites you own, you can ride in winds from 5-30 mph, but we suggest newcomers don't try anything over 15mph until they are confident in their skills.
C) Factors for choosing gear: Weight, Kite size, Snow Conditions, Wind speed.
Weight: Snowkiting, like most wind sports, requires different "sail" (kite) sizes depending on the speed of the wind, the rider's ability, and the rider's weight. The depth or lack of snow also plays a role: deep snow requires a lot of power from the kite whereas ice requires almost none.
Choosing the right kite: Snowkiting allows use of open cell foils, leading edge inflatables, water relaunchable foils and basic framed stunt kites. Open cell foils are by far the least expensive route. These kites fly on two, three, or four lines and, in the case of most 3 and 4 line kites, can be reverse launched when nose down in the snow. The main advantages of foil kites are ease of setup, ability to reverse launch, durability, and price. The drawback of these kites is that most foils are not sheetable, meaning the power is always on so the wind range of each kite is limited.
Open Cell Foils (Ozone Frenzy, Access; Naish Element, most trainer kites)
Pros: Foils hands down are the easiest to set up and get going. They also pack down small and don't require that you lug a pump around. Most high end foils have a reverse launch system so that they can be quickly relaunched after a crash without needing to take off your snowboard and weigh the kite down again or have a buddy assist you. The very high end foils have depower systems which work in the same way as inflatable 4 line kites, giving them much increased wind range. Most foils are also extremely durable, and can survive crashes that would cripple other kite designs.
Cons: Open cell foils are only useful for land/snow use as they will fill up with water rapidly if crashed while kitesurfing and turn into a fantastic sea anchor. Foils also have a tendency to collapse and behave erratically in gusty winds with lots of lulls. It's not uncommon to have the kite stall out and wrap itself up in its own bridle.
 Bow Shaped or SLE Inflatable Kites
Pros: Simple relaunch on the snow and water. Enormous depower range and built in safety system. It's the same kite you use on the water, so you are already used to its flight characteristics. The rigid skeleton of the inflated leading edge and struts maintains the kite's shape even in lulls. These kites just seem to want to stay airborne, and the gusts have much less effect on them, as do most of the lulls.
Cons: Durability is a concern when flying on lightly covered fields. Sharp sticks or brush can easily penetrate the leading edge bladder and lead to a time consuming repair. You need to pump these kites up, but with most current kites coming with single point inflation, this is less of an issue than it once was.
Framed Stunt Kites: Lots of people have an old framed stunt kite in the closet. These kites are great to start your snowkiting experience on. They won't pull too hard but can at least get you the feel of what it will be like. They work great for smaller kids in the 60-100 pound range that want to learn. Pull out that old kite and give it a try.
Final Thoughts: Cost is the biggest factor. Think about what you want to do more often, snowkite or waterkite. If you come to a decision between buying a snowkite and buying a water kite, go with the water kite in a Bow or SLE shape, as this will allow you to do both. If cost is no object, and convenience is important, the foil kites are hard to beat for portability and ease of setup.
Kite Size: In general, fly a kite one size smaller than you would in the summer for the same wind speed. Ice/hard snow is nearly friction free, and cold air is much denser than warm air - so you need less kite. On a 15 mph day on hardpack, a 170 lb person would use a 12m LEI, a 6-8 meter foil, or an 8-10 meter sheetable foil. Sounds confusing; it can be. There is a learning curve to judging wind speed and kite size, always err on the side of safety. On hardpack you could learn and get moving on a kite half as big as those in the example. Deeper snow means a larger kite; very deep snow with skis needs the same size kite as someone kiteboarding on the water. See our chart. Remember the chart is a guide and common sense should always be used.
 What to Ride: For your first season, use whatever you feel comfortable with and have ridden more. It is not necessary to have the best pair of skis or the nicest snowboard around to enjoy snowkiting.
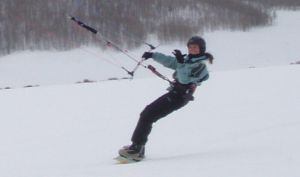
Skis: Shorter terrain park twin tip skis can be a benefit when you progress in your riding, but are not necessary to have fun. Skis have the advantage of being able to move your feet and allow you to get more kite control if the winds are gusty and light. Depending on size and shape, skis can hold an edge at incredible speeds.
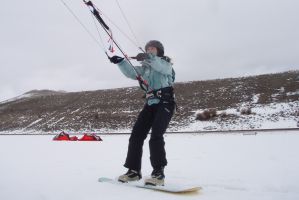
Snowboards: Snowboards have the advantage of giving you a ride closer to water kiteboarding. Your stance and leg movement are very similar, thus it will translate to your kiteboarding in the spring. The biggest difference will be in weight distribution. You will need much more pressure on your front while snowboarding to maintain an edge. Snowboard sizing is highly subjective, but in general a 165cm board works well for a 6 foot tall person. Snowboard bindings: flow or other easy entry bindings are a plus, but don't feel that you need to invest a fortune in new gear.
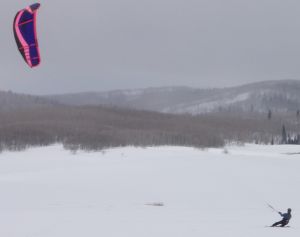
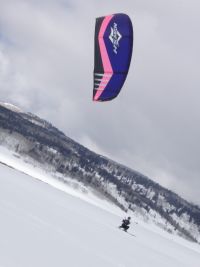
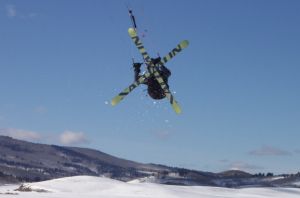
Where to Ride: An ideal location would be a large, well-frozen lake with 4-6 inches of snow. This gives some padding when you fall, but is not so deep that it bogs down a beginner. As you progress, you'll be looking for deeper and deeper snow. Many snowkiters also use large open fields; just make sure that you obtain perfmission first if this is private land. Make sure that wherever you ride, you inspect the area prior to setting up your kite. Identify and stay well away from trees, fences, roads, houses, and powerlines. Give at least 100 yards space downwind to any obstacle, and remember that on ice you can't stop rapidly, and if you fall you will slide a very long way. It's also important to point out that snowkiting can generate some enormous jumps, and that ice is harder than concrete. Don't boost unless you know that you have more than enough snow to land safely. Think safety first, and enjoy yourself. If a situation looks sketchy, then don't ride in that area.
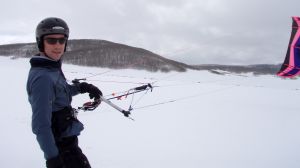 Helmet: This is key, and not an option because black ice is harder than concrete. Find a good ski or snowboard helmet that fits, and wear it. Some use hockey or other helmets as well; the point is that you need skull protection when on the ice. There are several arguments as to which type of helmet is best; most helmets are built like bike helmets and use a hard, energy-absorbing foam core. These helmets are light weight, but remember, after one solid head impact the helmet must be replaced. A friend once said "If you have a $10 head buy a $10 helmet". What's your brain worth?
Ice Claws: If you kite on frozen lakes, get a pair. They are simple ice picks that are essential to self rescue in the event you fall through the ice. They allow you to get a grip and pull yourself up and across the ice.
Clothing: Dress like you would for skiing, and take off one layer of clothing. This is an energy-intensive sport similar to cross country skiing, so you will be working out. Bring an extra layer so that you can put on dry warm clothes when you are finished and begin to cool down. Normally we wear a shell parka and shell pants, and lightly insulated windproof gloves to keep dry and to block the wind.
 Harness: This is up to the individual. Most beginners prefer wearing a seat harness. But it's up to you and what you feel comfortable in. Seat harnesses are a bit more comfortable for long-term riding as they put the weight on your hips and support your lower back. Waist harnesses allow more freedom of movement, but put the load up higher which may be uncomfortable for some.
Pads: Wear whatever you feel you need. I always use knee pads and elbow pads; some don't. Other guys wear downhill mountain bike body armor; it all depends on how high or fast you want to go. Always be prepared and remember that being a bit over protected is better than not being protected enough.
Safety: Beyond kiting. Below is a link to an article on Hypothermia from our Kiteboarding FAQs section. Due to the potential for falling through the ice or simply spending too long outdoors in low temperatures/high winds this information can be crucial.
Surviving Cold Weather
Return to the Kiteboarding Knowledge Center